About
The plugin provides integration with Asterisk PBX. The application’s users can occupy numbers as operators of a call-center and process calls. There are sip: links generated for performing outgoing calls from SIP clients, history of those has been tracked other process messages together with incoming calls.

Setup
| You can see (queue Plugin Asterisk) the plugin operation in Demo System. |
Trunk
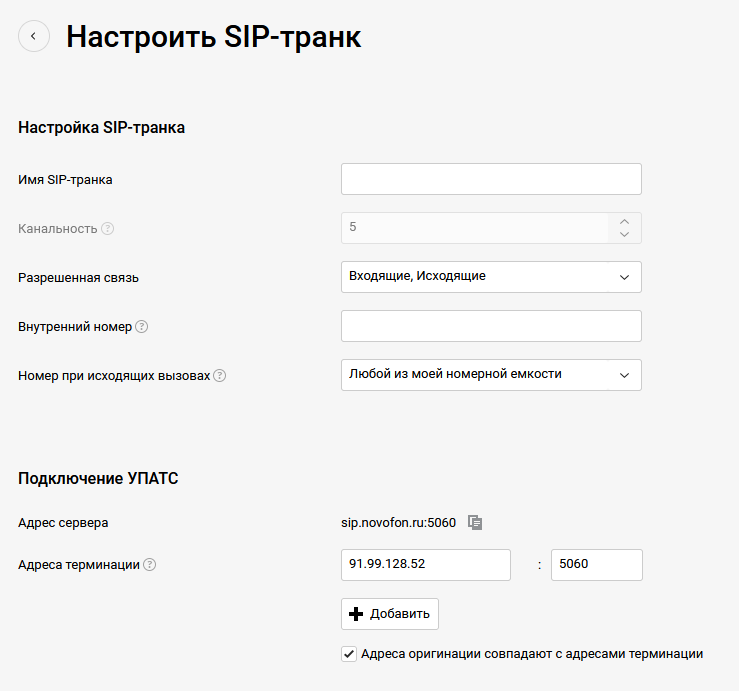
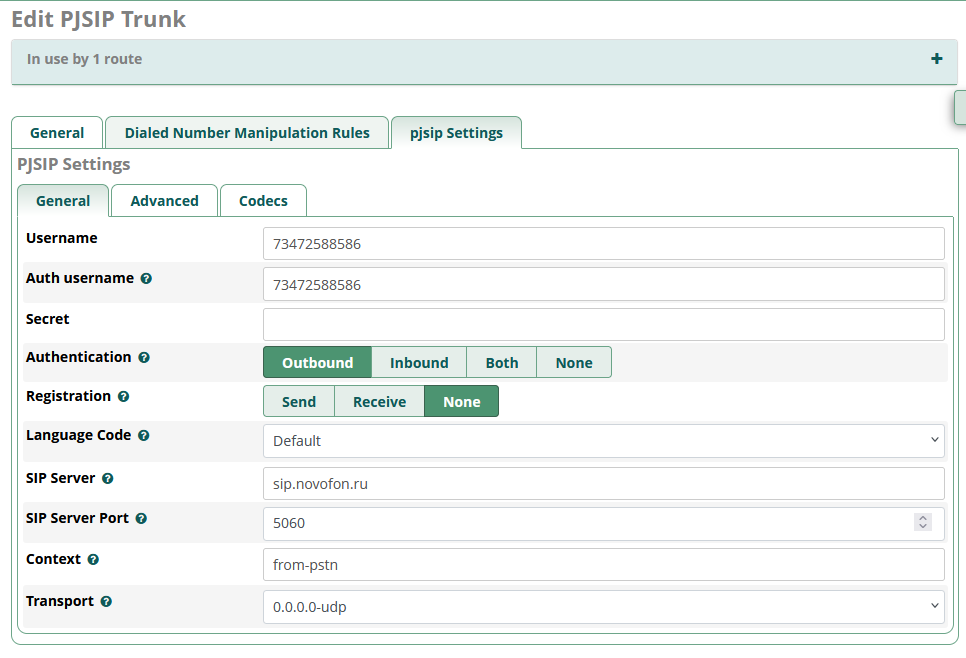
A SIP Trunk connects your PBX with the rest of the world voice calls network. It must have a phone number(s), which is used for accepting incoming calls, which later forwarded to your PBX’s internal users. That number is also treated as the from for outgoing calls.
To obtain such a trunk, you have to select a SIP Number Provider and configure there a number, connected to your PBX via a trunk. Typically there are have to be defined IP address and port (5060 default for SIP) of the PBX.
For ability to make outgoing calls from your PBX users via the provider there have to be delivered host and port. And sometimes a secret for authentication needs. Ways of self-configuration of these settings differ for providers, in the table below are described for some of them.
Novofon
Create a Number: https://my.novofon.ru/vpbx/connecting-numbers
Create a SIP trunk: https://my.novofon.ru/vpbx/sip-trunk
The properties of the trunk, 91.99.128.52 is the IP of the connected PBX:
Connect the number with the trunk:

PBX
FreePBX is an web-based shell for Asterisk PBX, allowing to configure it with UI. Despite on much more complex configuration, it is still possible to use bare Asterisk, in this case skip the sub-chapters below until AMI.
Install
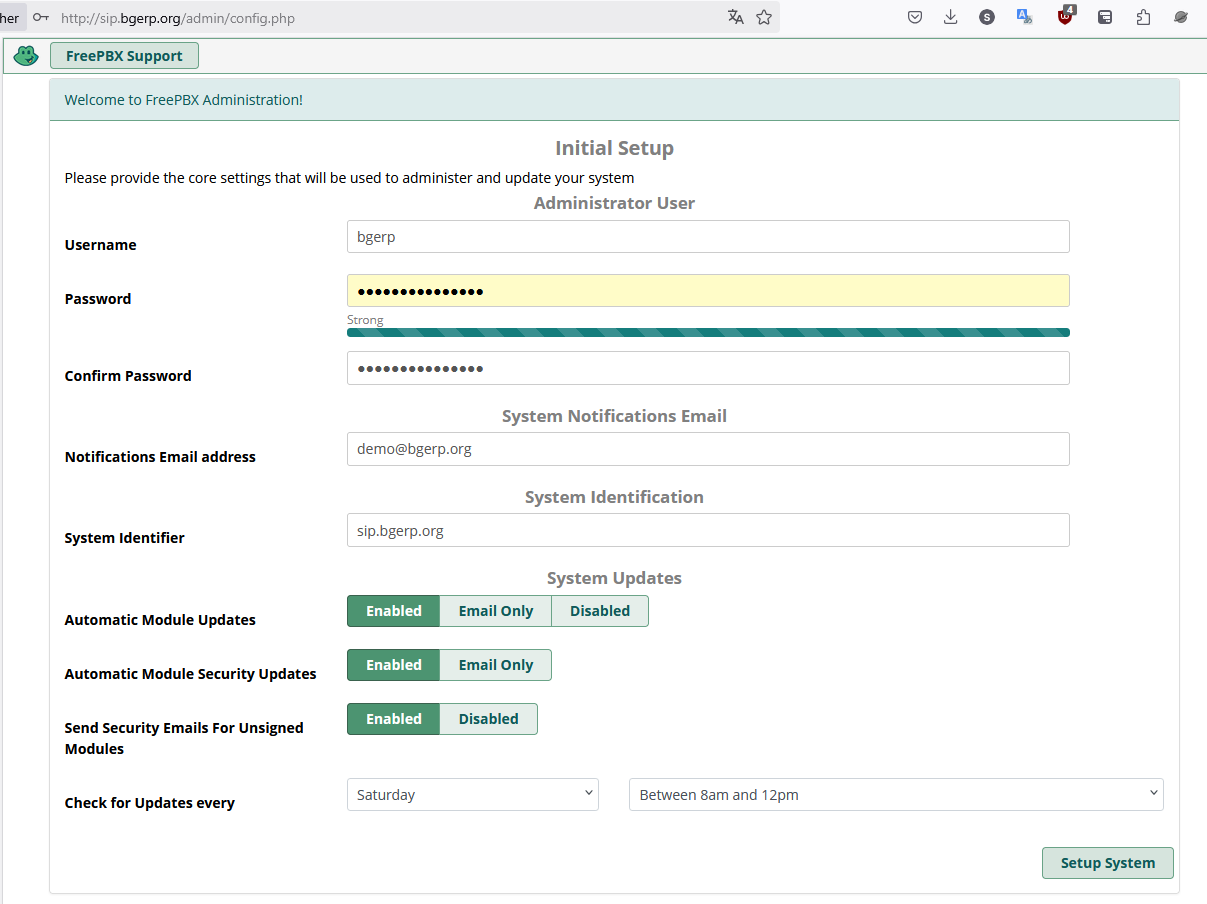
FreePBX 17 can be installed on a dedicated Debian 12 system:
cd /tmp &&
wget https://github.com/FreePBX/sng_freepbx_debian_install/raw/master/sng_freepbx_debian_install.sh -O /tmp/sng_freepbx_debian_install.sh &&
bash /tmp/sng_freepbx_debian_install.sh| The process takes ~ 20 minutes for 2 CPU VPS with 4 GB RAM |
After the script has done, reach the server via HTTP and finish setup there.
| Be sure that at least the SSH access is allowed in Connectivity / Firewall settings |
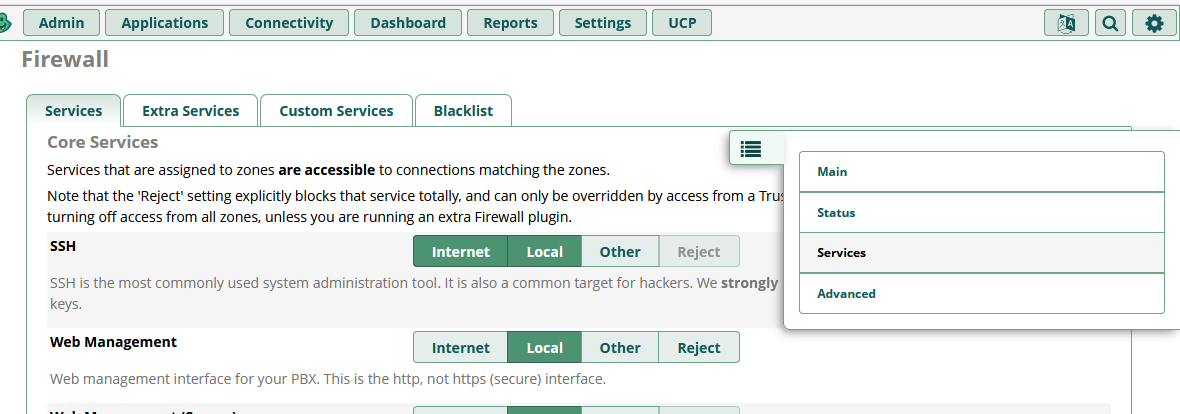
With the SSH access you can always add an IP for accessing the HTTP interface:
fwconsole firewall trust <IP>Or just temporary stop the firewall:
fwconsole firewall stopUsers
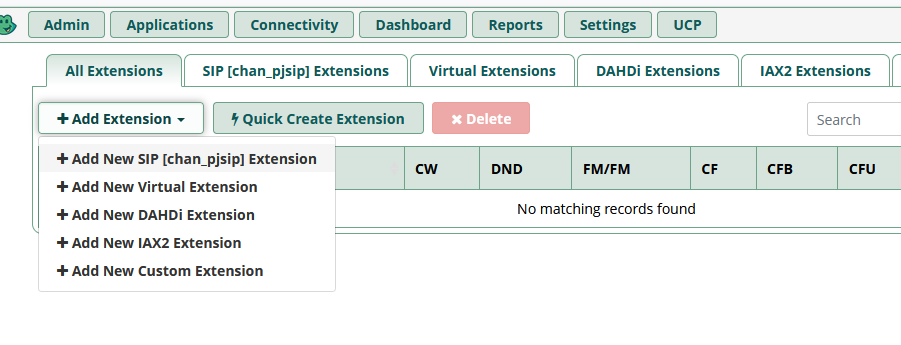
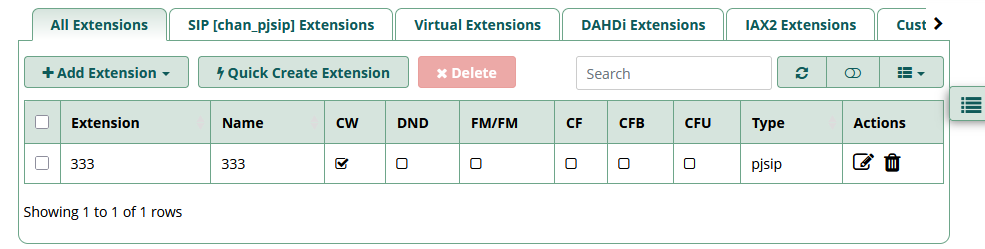
Create an internal user account with number in Connectivity / Extensions, like shown on the screens below.
| The password field is blurred and shown only when mouse pointer is placed on |
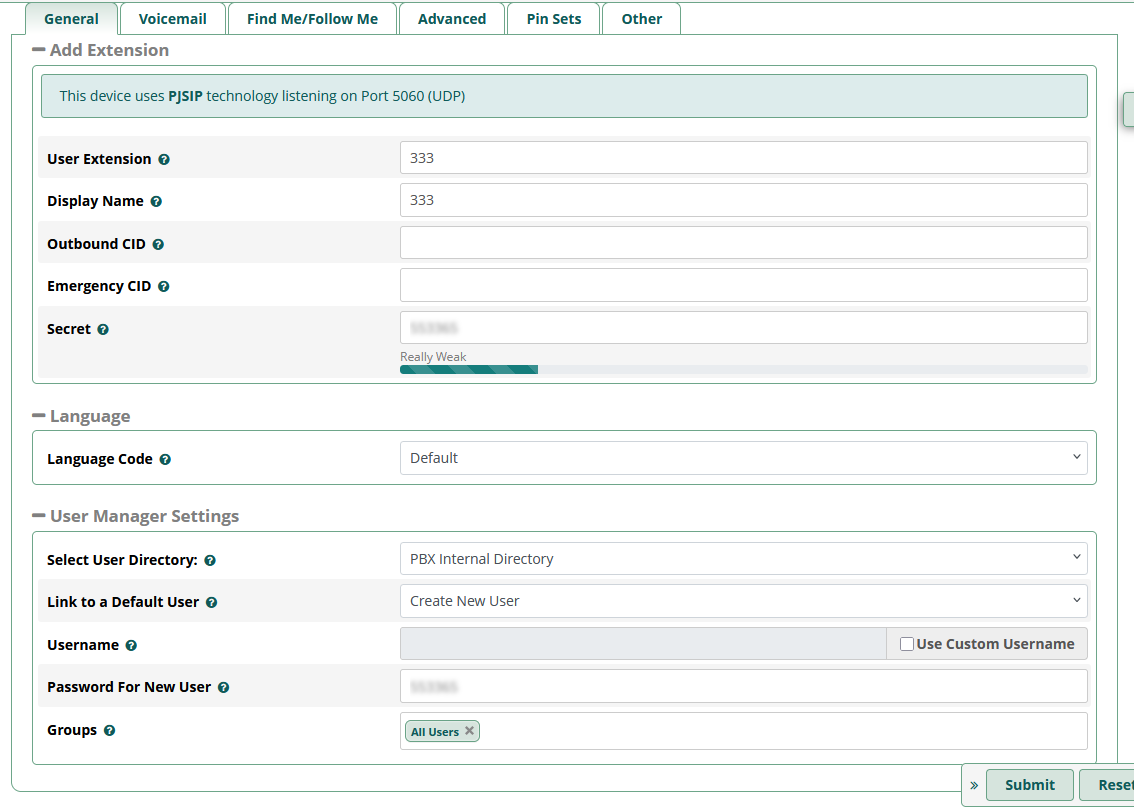
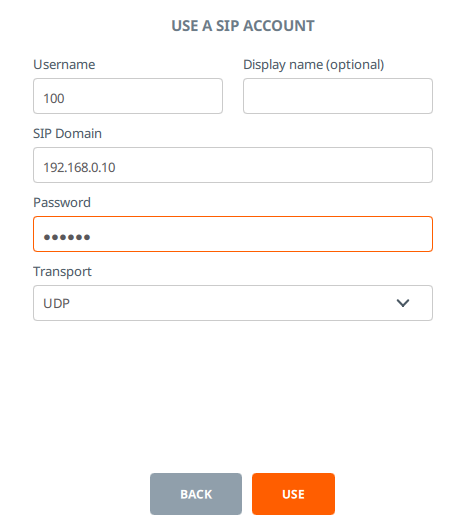
The user credentials should be used in a your SIP Client.

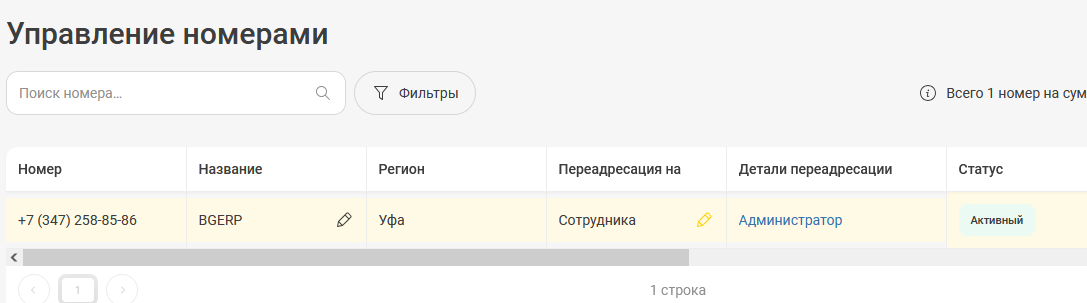
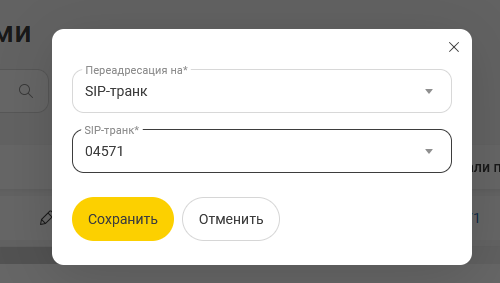
Route IN
In Connectivity / Inbound Routes is defined the configuration for incoming calls. Among many available options to handle those, they can be forwarded to PBX’s users using Queues.
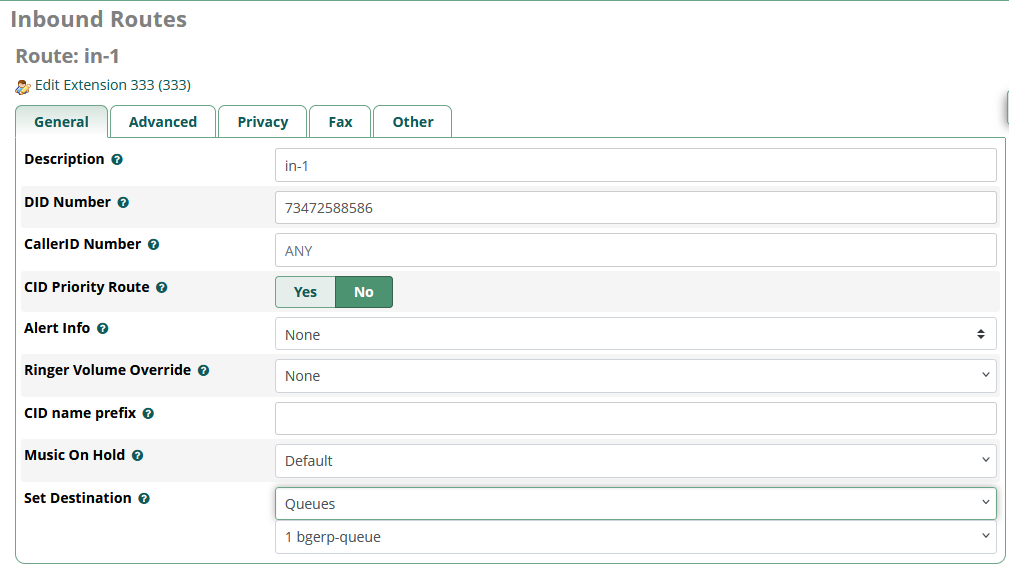
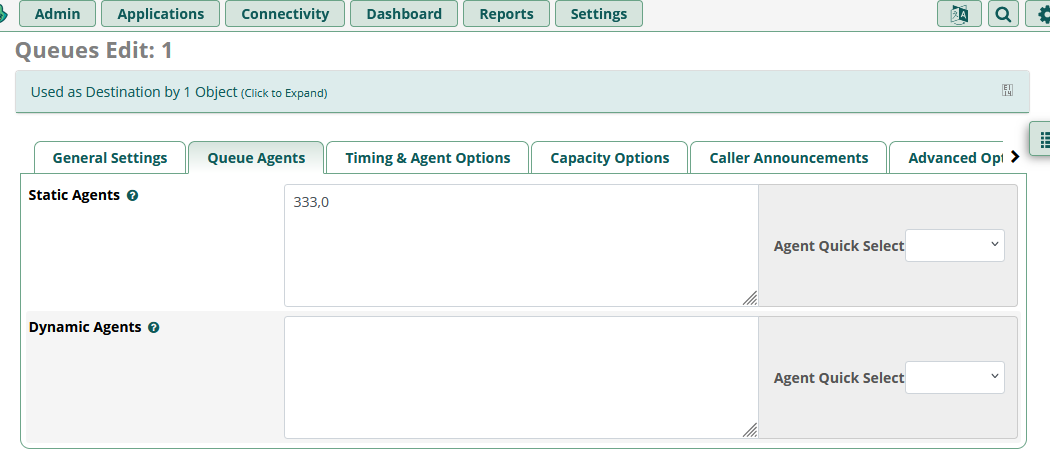
Here is the simple queue configuration, they can be found later in Application / Queues
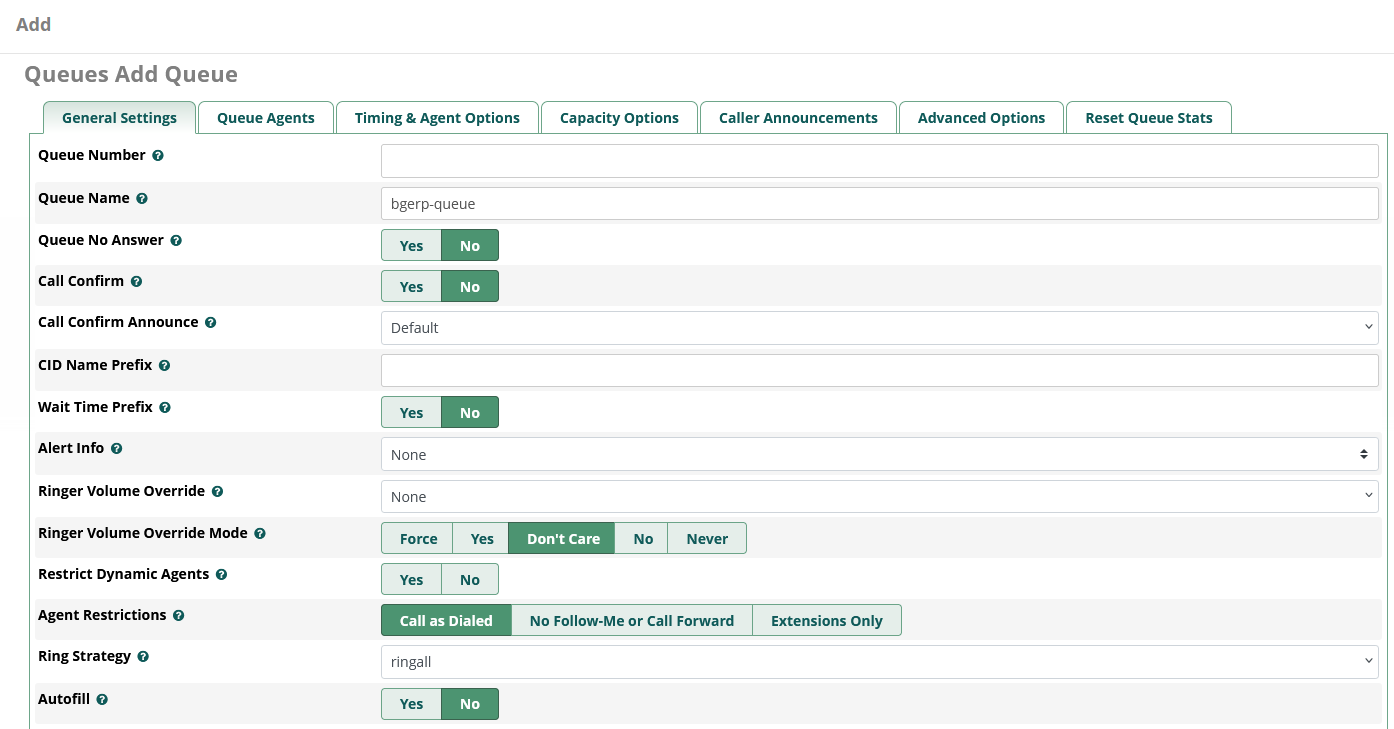
Forwarding to only one existing user 333
Usually before forwarding calls to PBX users responds an IVR. Records for that may be uploaded to Admin / System Recordings.
AMI
Application Manager Interface (AMI) provides the way for integration with the Plugin. That listens Asterisk events using TCP connection, defined in file /etc/asterisk/manager.conf. Change the file in the following way:
[general]
enabled = yes
port = 5038
bindaddr = 0.0.0.0

[<AMI_LOGIN>]
secret = <AMI_SECRET>
deny = 0.0.0.0/0.0.0.0
; allowed networks with masks
permit = 127.0.0.1/255.255.255.0
permit = <BGERP_IP>/255.255.255.0
read = call
writetimeout = 5000
Where:
-
<AMI_LOGIN> and <AMI_SECRET> - connection credentials, used by the Plugin;
-
<BGERP_IP> - IP address where your BGERP is running.
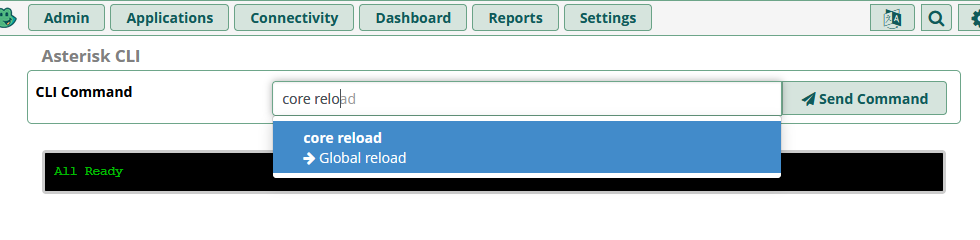
To apply the changes call core reload Asterisk CLI command, for FreePBX it can be done in menu Admin / Asterisk CLI.
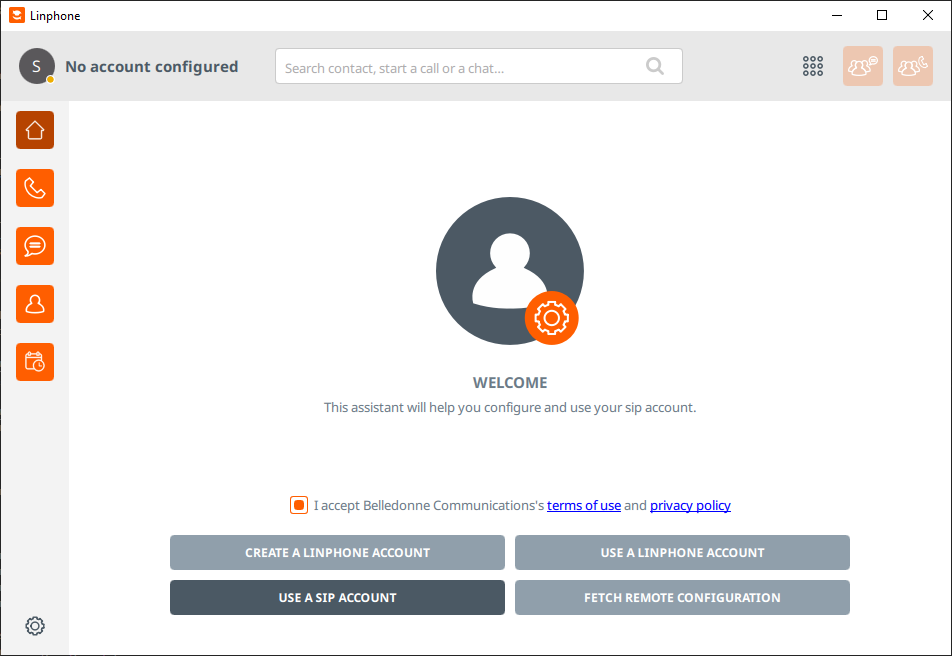
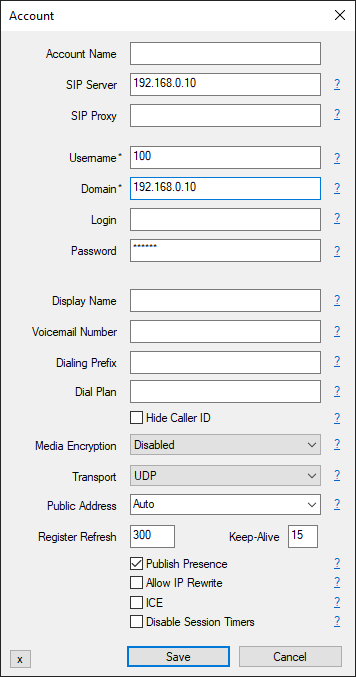
SIP Clients
The clients connect to Asterisk server and used as phone devices.
| Client and Platforms | Configuration |
|---|---|
|
https://www.linphone.org/en/getting-started iOS, Android, GNU/Linux, macOS, Windows |
|
|
https://www.microsip.org/ Windows |
Popup menu Edit Account |
Plugin
Make sure the plugin is enabled and append to the configuration:
asterisk:amiManager.{@inc:cnt}.messageTypeId=<MESSAGE_TYPE_ID>
asterisk:amiManager.{@cnt}.host=<HOST>
asterisk:amiManager.{@cnt}.login=<AMI_LOGIN>
asterisk:amiManager.{@cnt}.pswd=<AMI_SECRET>
# optional
# change default AMI port
#asterisk:amiManager.{@cnt}.port=5038
# speeds connection process up or solves problem with undetectable version
#asterisk:amiManager.{@cnt}.version=<VERSION>
# redefinition of listener with a the custom class
#asterisk:amiManager.{@cnt}.listenerClass=<LISTENER_CLASS>
# JEXL number resolver for the default listener
#asterisk:amiManager.{@cnt}.expression=<JEXL>
Where:
-
<MESSAGE_TYPE_ID> - ID of message type Call, used for persisting calls into the system;
-
<HOST> - host where Asterisk with AMI is running;
-
<AMI_LOGIN> - AMI login;
-
<AMI_SECRET> - AMI password;
-
<VERSION> - version string, may be: 'Asterisk 13.0', 'Asterisk 16.0', see: https://github.com/asterisk-java/asterisk-java/blob/master/src/main/java/org/asteriskjava/AsteriskVersion.java;
-
<LISTENER_CLASS> - custom listener Java class, extending the default ru.bgcrm.plugin.asterisk.ami.AmiEventListener
-
<JEXL> - JEXL expression for number resolving in the default listener
Example:
asterisk:amiManager.{@inc:cnt}.messageTypeId=1
asterisk:amiManager.{@cnt}.host=192.168.0.10
asterisk:amiManager.{@cnt}.login=crm
asterisk:amiManager.{@cnt}.pswd=234567
Debug
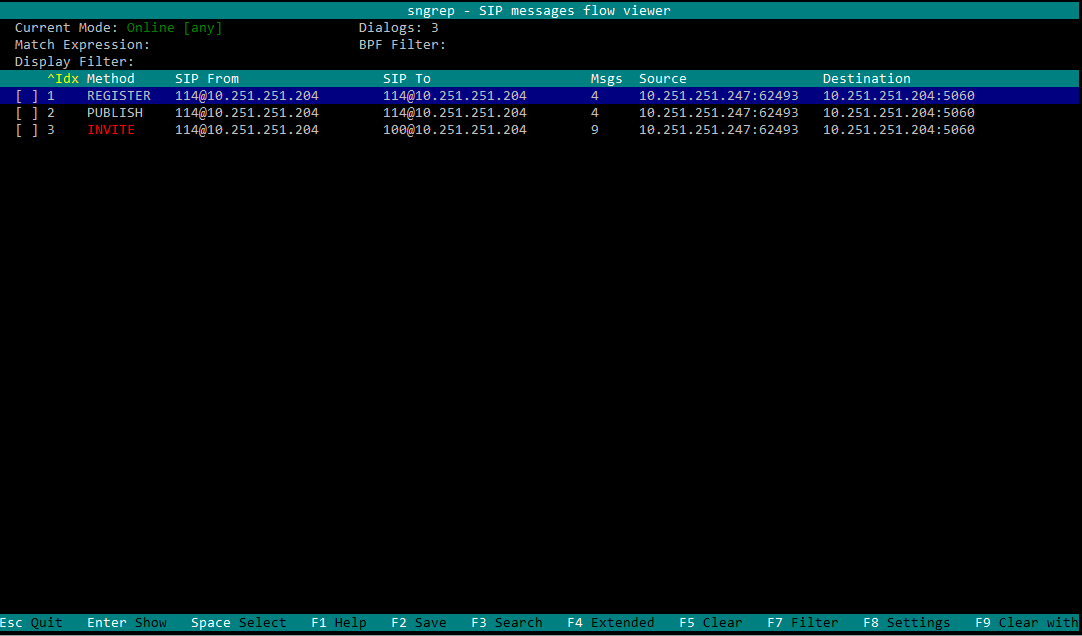
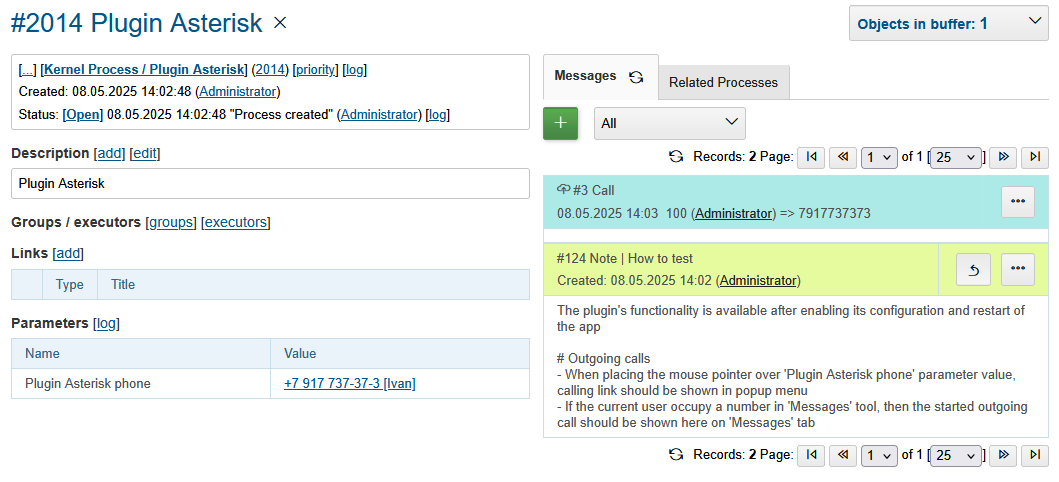
Once the plugin is enabled and a number is occupied, for every configured MessageTypeCall will be shown test areas in Messages tool. Those allow you to simulate both incoming and outgoing calls.
Incoming call:
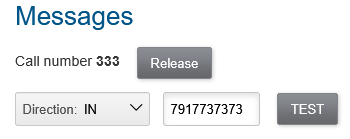
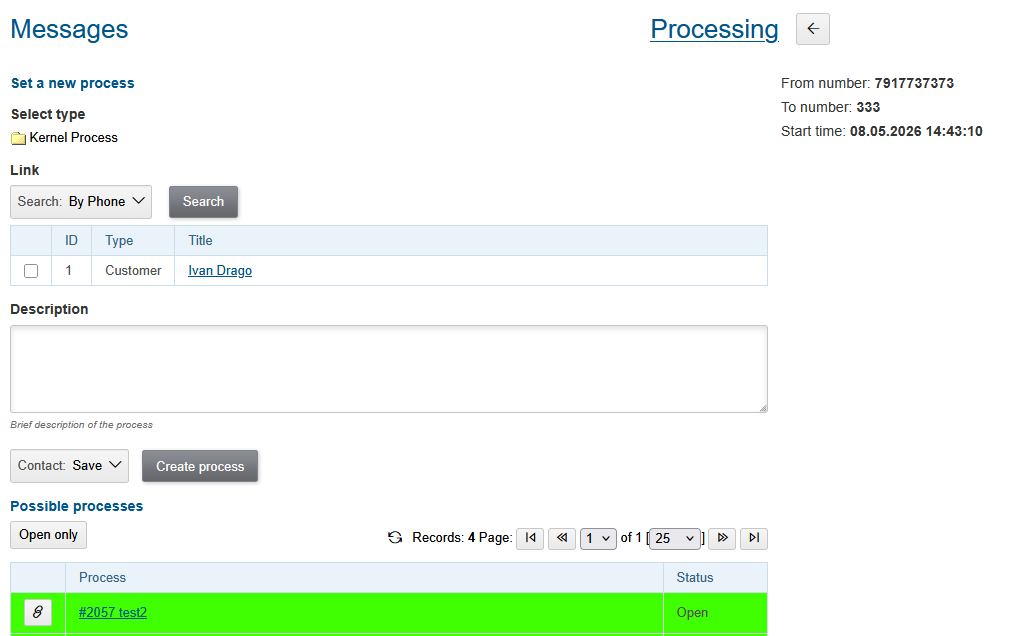
Result:
Outgoing call for a process:
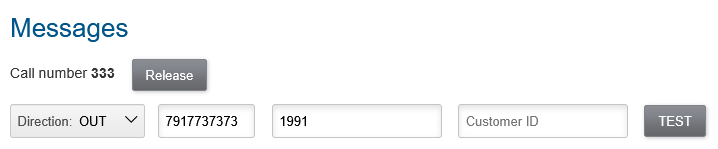
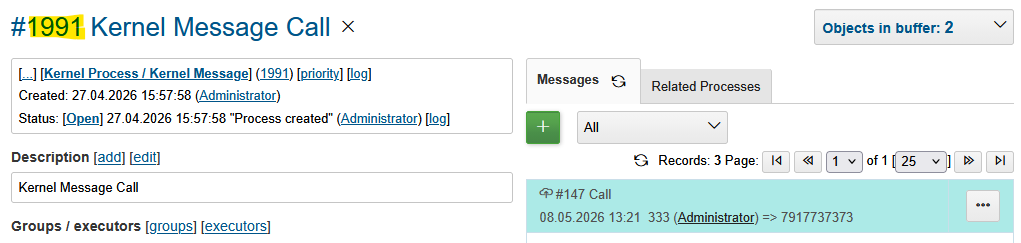
Result:
Outgoing call for a customer:

Result:
| The test area can be hidden by disabling Test action in user permissions. |
After successful connection with AMI, events should be written down to bgerp.debug.log like in the example with NewStateEvent below.
Number Resolving
The number resolving JEXL expression processes received NewStateEvent[state='Up'] AMI events, appearing when a call was accepted by recipient.
05-06/11:21:04 INFO [Asterisk-Java ManagerConnection-604-Reader-0:AsyncEventPump] AmiEventListener - AMI org.asteriskjava.manager.event.NewStateEvent[file='channel.c',func='ast_setstate',line='7415',sequenceNumber='1003806962',dateReceived='Wed May 06 11:21:04 OMST 2026',privilege='call,all',linkedid=null,server=null,calleridname='Icemann',channel='SIP/8777-0011a01b',language=null,exten=null,calleridnum='777',context=null,state='Up',callerid='777',connectedlinenum='333',uniqueid='1778044860.9547927',timestamp='1.778044864130435E9',channelstatedesc='Up',systemname=null,connectedlinename='Ivanov',sequencenumber='1003806962',priority=null,channelstate='6',accountcode=null,systemHashcode=1348493735]
The expression can be defined for AMI manager configuration:
asterisk:amiManager.{@cnt}.expression=<<END
    <JEXL>
END
Its context becomes the following variables:
-
event - object of class NewStateEvent whose attributes can be retrieved using getter methods;
-
messageType - object of class ru.bgcrm.dao.message.MessageTypeCall with the actual message type;
-
number - object of class ru.bgcrm.plugin.asterisk.ami.NumberResolver, the resolved our and their numbers should be set there.
Even if not explicitly defined in configuration, there is running default JEXL logic:
// PzdcDoc snippet of: 'Default Number Resolver JEXL', lines: 1 - 5

callerIdNum = event.getCallerIdNum();
connectedLineNum = event.getConnectedLineNum();
if (u.notBlankString(callerIdNum) && u.notBlankString(connectedLineNum)) {
    number.ourTheir(callerIdNum, connectedLineNum);
}
The our number here has been taken from attribute calleridnum and their number comes from connectedlinenum. After the JEXL logic, the our number is being searched for among the occupied numbers. The call is treated as outgoing if it was initiated from the system. Otherwise, the call is considered incoming.
A script is used to adapt the plugin to the diverse forms of Asterisk AMI events. In the following example:
// PzdcDoc snippet of: 'Number Resolver JEXL Example', lines: 1 - 21

callerIdNum = event.getCallerIdNum();
connectedLineNum = event.getConnectedLineNum();

if (u.notBlankString(callerIdNum) && u.notBlankString(connectedLineNum) &&
    (callerIdNum.length() > 3 || connectedLineNum.length() > 3)) {
    reg = messageType.getRegistrationByNumber(callerIdNum);
    // incoming
    if (reg != null && reg.getOutCall() == null) {
        number.ourTheir(callerIdNum, connectedLineNum);
    } else {
        // channel='SIP/777-0011a01b' => our=777
        channel = event.getChannel();
        if (u.notBlankString(channel)) {
            our = su.substringBetween(channel, "/", "-");
            reg = messageType.getRegistrationByNumber(our);
            if (reg != null && reg.getOutCall() != null) {
                number.ourTheir(our, connectedLineNum);
            }
        }
    }
}
Being performed several steps. First of all, ignored internal calls between three-digit numbers.
(callerIdNum.length() > 3 || connectedLineNum.length() > 3)For incoming calls resolving has been done in a default way using calleridnum and connectedlinenum attributes.
    reg = messageType.getRegistrationByNumber(callerIdNum);
    // incoming
    if (reg != null && reg.getOutCall() == null) {
        number.ourTheir(callerIdNum, connectedLineNum);
    }
For outgoing ones there is no other way to do it as using channel attribute to extract our number from it.
Outgoing Call Links
Calling number for Outgoing Calls can be adapted using JEXL expression, assigned for message type Call with expressionOutNumberPreprocess key. To the JEXL context passed the following variables:
-
p or process - object of class ru.bgcrm.model.process.Process, the process;
-
pp or processParam - object of class org.bgerp.dao.expression.ParamExpressionObject, process parameters;
-
value - object of class ru.bgcrm.model.param.ParameterPhoneValue, phone values.
Sample of such a script, adding missing + prefix for a calling numbers.
messageType.50.expressionOutNumberPreprocess=<<END
    if (!value) return;
    for (item : value.getItemList()) {
        phone = item.getPhone();
        if (!phone.startsWith("+"))
            item.setPhone("+" + phone);
    }
END
Another one, appending routing prefixes depends on a list process parameter value with ID 68.
messageType.50.expressionOutNumberPreprocess=<<END
    if (!value) return;

    prefix = null;

    operator = pp.listValueIds(68);
    if (1 =~ operator)
        prefix = "084";
    else if (2 =~ operator)
        prefix = "056";

    if (prefix) {
        prefix = prefix + "7";

        log.debug("prefix: " + prefix + "; value: " + value);

        for (item : value.getItemList()) {
            phone = item.getPhone();
            if (phone.length() == 11)
                item.setPhone(prefix + phone.substring(1));
        }
    }
END
Usage
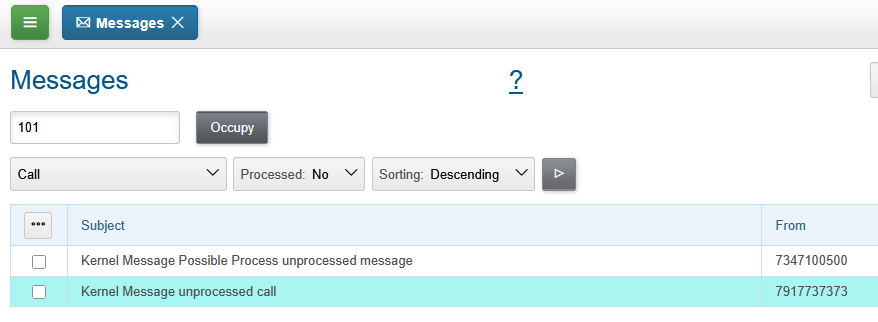
Number Occupation
In Messages tool user can occupy an internal SIP number, used by him for connection to Asterisk. The offered number can be configured and even automatically occupied on user login.
If the wanted number is already used by someone else, the confirmation dialog has shown.
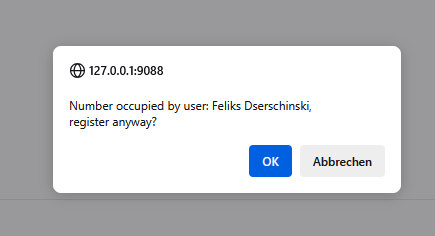
For the user, whose number was taken, sent an information news about.

Successfully occupied number does look so. The Release button should be used for releasing the number.

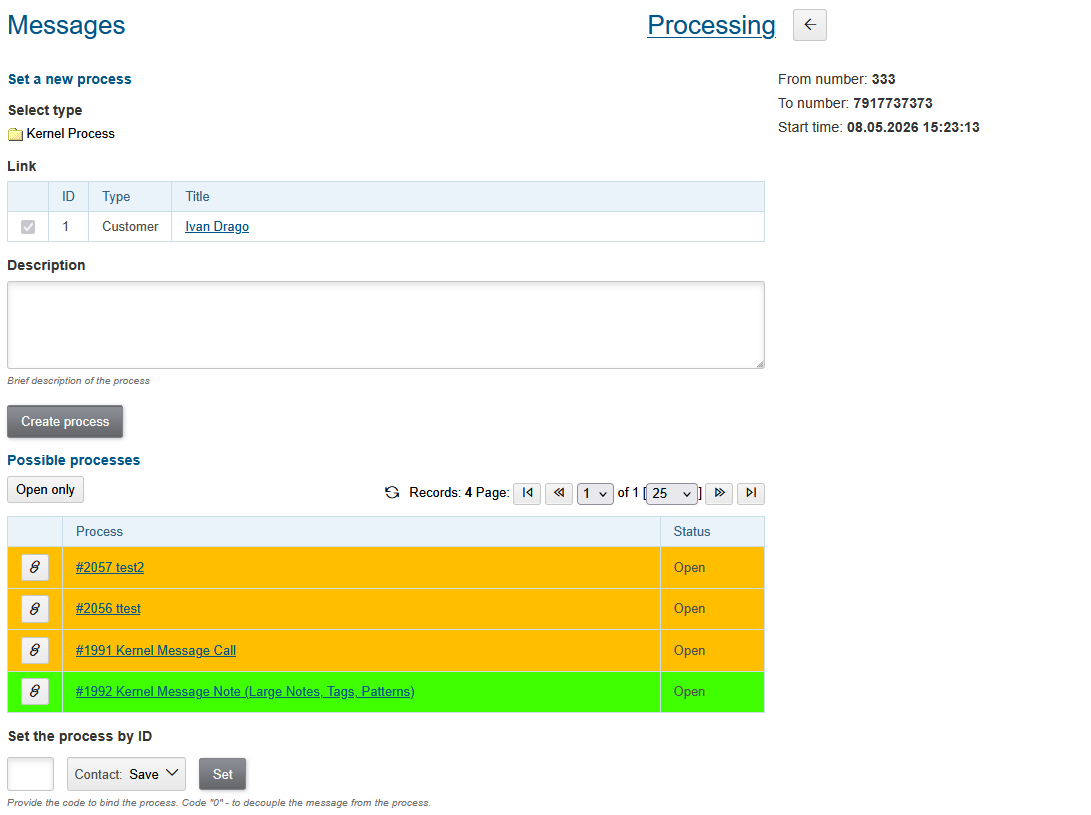
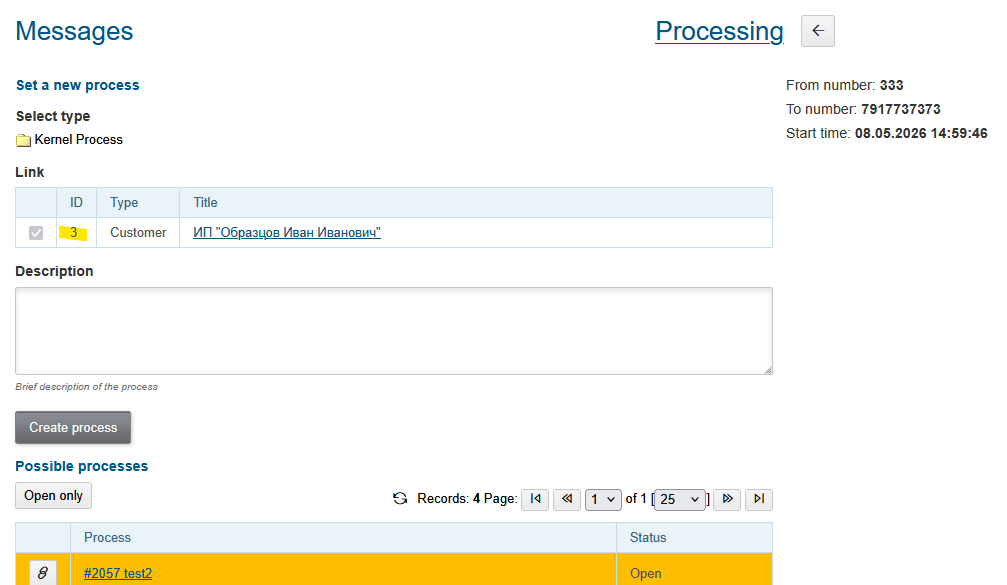
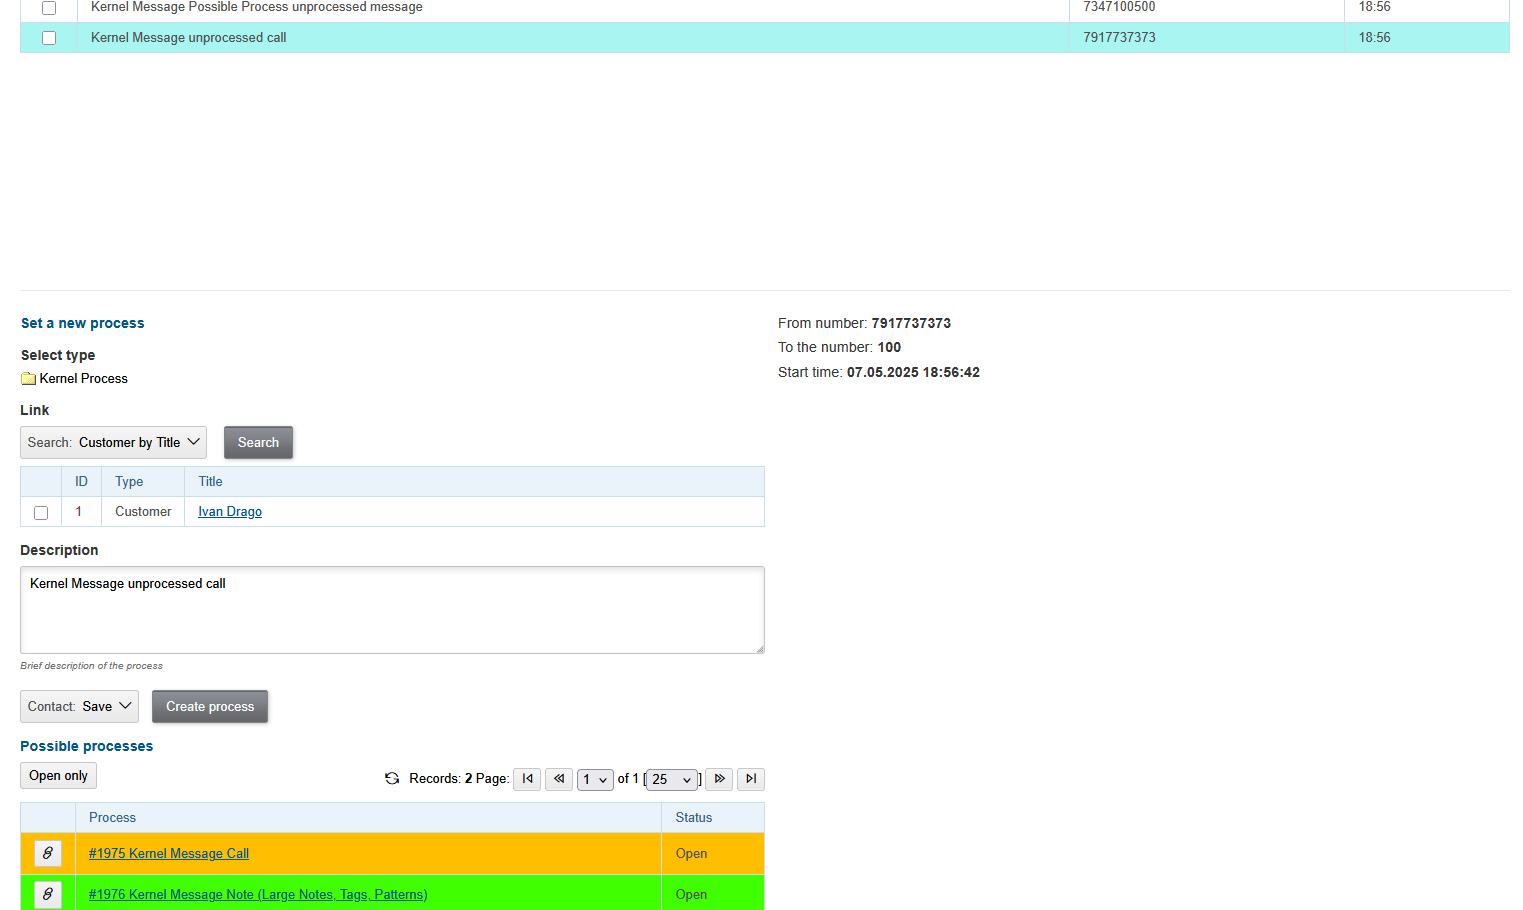
Message Processing
After occupation a number by a user, all the accepted calls there must be registered as messages and opened for processing.
Outgoing Calls
On hover mouse pointer over customer and process param phone values the plugin shows popup menu for making outgoing calls.

The calls itself are passed to OS application with configurable link.
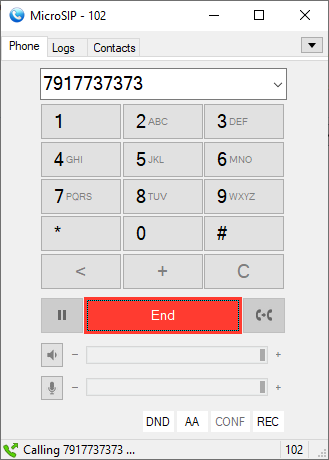
If the current user’s number is occupied and once the call being responded, it appears in the Message tab of the process.
For a customer call it has been opened for processing with the customer predefined in links.